How to Use Cyberduck with Geyser Data Cloud Tape Library: A Step-by-Step Guide
- Nelson Nahum

- Mar 12, 2025
- 2 min read
Updated: Mar 13, 2025
Are you looking to leverage Geyser Data's robust cloud storage for your data needs while using the familiar cyberduck interface? You're in the right place. In this guide, we'll walk you through the steps to configure Cyberduck to work seamlessly with Geyser Data, enabling you to manage your cloud storage efficiently and effectively.
Step 1: Install and Launch Cyberduck
If you haven't already, download and install Cyberduck from Cyberduck. Once installed, open the application to begin the setup.
Step 2: Enable Path Style requests
Click on the Cyberduck on the top left of your screen.
Click Settings.

In the settings window, click on Profiles and search for “S3 path”
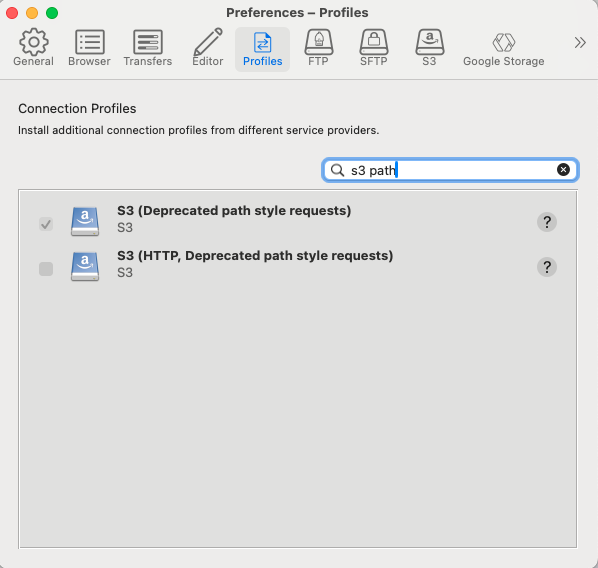
Make sure the top checkbox is selected. Geyser intends to support virtual path requests soon but for the time being we depend on this change.
Close this window
Step 3: Configure Cyberduck to point at your new Cloud Tape Library
Click the Pencil to create a new configuration
Configure the settings using the S3 path style requests

Make sure to configure the server, access key, secret key, and path.
The server and path are as follows:

Close this window.
Step 4: Login and upload data
Login and double click

Right click and upload files.

Conclusion
Using Cyberduck with Geyser Data allows you to harness the power of Geyser’s scalable and secure cloud storage while maintaining a user-friendly interface. Whether you're managing large datasets or just need an efficient backup solution, this setup provides a streamlined and reliable option for your cloud storage needs.
Make sure to regularly monitor your storage usage and manage your buckets effectively to optimize your cloud storage experience. If you encounter any issues, refer to the Cyberduck help resources or contact Geyser Data support for assistance. Happy cloud managing!
Comments